How to make beaded bangle?

If you’re feeling nostalgic for those bracelet-making kits you enjoyed playing with when you were a child, why not source your own beads and make a gorgeous, one-of-a-kind bangle as an adult? Whether you’re looking to offer a bespoke gift to a friend, or simply want to jazz up an outfit with a unique creation, a homemade bangle can be a great way to explore your creativity while making something with innate, sentimental value.
In this guide, we’re going to show you how to make a beaded bangle yourself, so you can rock your very own custom jewelry whenever you feel like it. Let’s get started!
WHAT YOU NEED TO MAKE A BEADED BANGLE
So, where to begin? First of all, you gather and source all the materials that you’re going to need to make your bangle. Here’s what you’re going to need:
- An elastic cord or string. This is going to be your bangle’s body, so make sure to choose something durable and preferably elastic. Elastic makes it easier to wear, and also helps prevent breakage – homemade bangles can be incredibly delicate, so a strong elastic is recommended.
- Beads of your choosing. This is the fun part! You can source a variety of different beads for your bangle, with plenty of bead kits online to choose from. Whether you’re looking for precious gemstones, wooden beads, or colorful beads, this is your opportunity to explore your creativity and choose something eye-catching. Custom jewelery is a Vogue-certified trend, so don’t feel limited when creating your design!
- Optional charms. Charms are great if you want to add a personal touch to a gifted bracelet or bangle. If you want to add a personalized charm, make sure to look for something relatively lightweight where possible.
- Scissors and glue. You’ll need scissors to cut the string or thread accordingly.
- Sellotape or duct tape. Tape can come in useful for preventing the beads slipping off the thread.
- Tray. Beads do have a tendency to spill everywhere, so it’s a good idea to invest in a bead tray if you plan on making more than one bangle.
HOW TO MAKE A BEADED BANGLE: STEP BY STEP
Once you’ve gathered all your supplies, it’s time to get started! Follow the steps outlined below and you’ll be wearing your custom bracelet in no time:
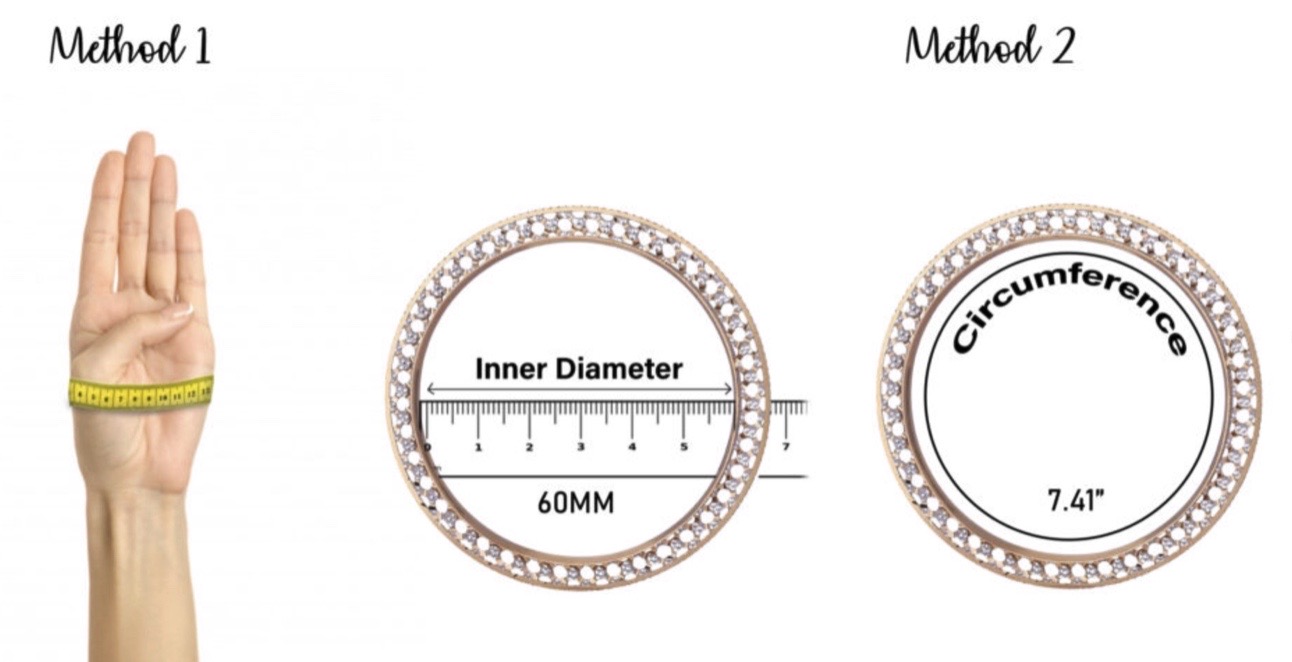
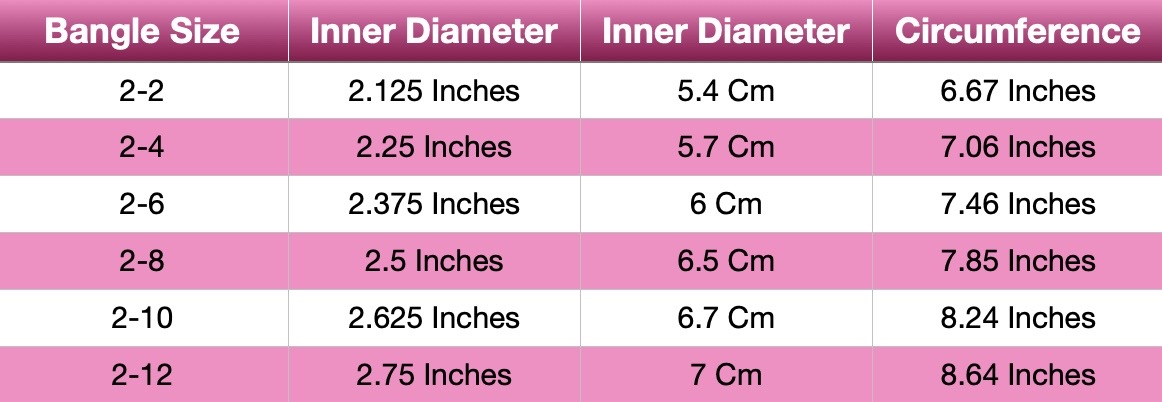
MEASURE YOUR WRIST
Before beginning, make sure to measure your wrist to ensure you’re creating a bangle that will actually fit. If you’re making the bangles for a friend or loved one, try to estimate their wrist size by comparing their wrists to yours. Alternatively, you can measure the inner circumference of their watch, or one of their existing bangles, to increase accuracy. Make sure to add a little room so that the bangle can easily slide onto the wrist (measuring around your knuckles while your fingers are clasped together is a good way to do this.)
CUT THE ELASTIC AND PLAN YOUR DESIGN
Cut the elastic according to your bangle size, and plan what beads you’re looking to use in your design. Planning your design in advance will help you see if there are too many (or too few) beads, so you can adjust accordingly. Before beginning to bead, cover one end of the elastic with some sticky tape, so that the beads won’t slide off the other end.
BEGIN BEADING
Depending on how thick your elastic is, you should be able to begin beading right away, without the need for a needle and thread. If your beads are too small and the elastic too thick, don’t fret! A needle and thread should be able to help you get the beads onto the bangle with ease. As you’re adding beads, make sure to wrap the bangle around your wrist occasionally to check it still fits.
TIE A KNOT AND GLUE
Once you’re finished beading, you’re going to want to tie a square knot around the end of the elastic. Don’t worry if it’s visible – you can easily conceal the knot either by trimming it down or pushing it into one of the holes in the beads. Now, taking your superglue – and making sure to be incredibly careful – glue the two beads from each end together. Let the glue dry before wearing the bangle.
And there you have it! Whether you want to offer your bracelet as a gift, or wear it alongside your own 22 karat gold bangles, you’ll enjoy a custom piece of jewelry that truly is one of a kind! Note: if you’re under the age of 16, please make sure to enlist an adult to help you when it comes to using the scissors and superglue.
Happy bangle making!